Segmenting the network by setting up VLANs, and
- setting up VLANs on a Dell PowerConnect 2816 switch,
- configuration of multiple SSIDs/WiFi networks in Ubiquiti Unifi,
- telling pfSense how to handle the configured VLANs and
- finally, moving clients onto the respective VLANs/WiFi networks. — That’s when the real fun started…
As outlined in the first and second post of this series, the basic idea of separating “trusted” and “untrusted” clients is to set up separate VLANs and move clients to different VLANs.
For clients connecting via WiFi, different WiFi networks can be configured and each WiFi network can be associated with one existing VLAN.
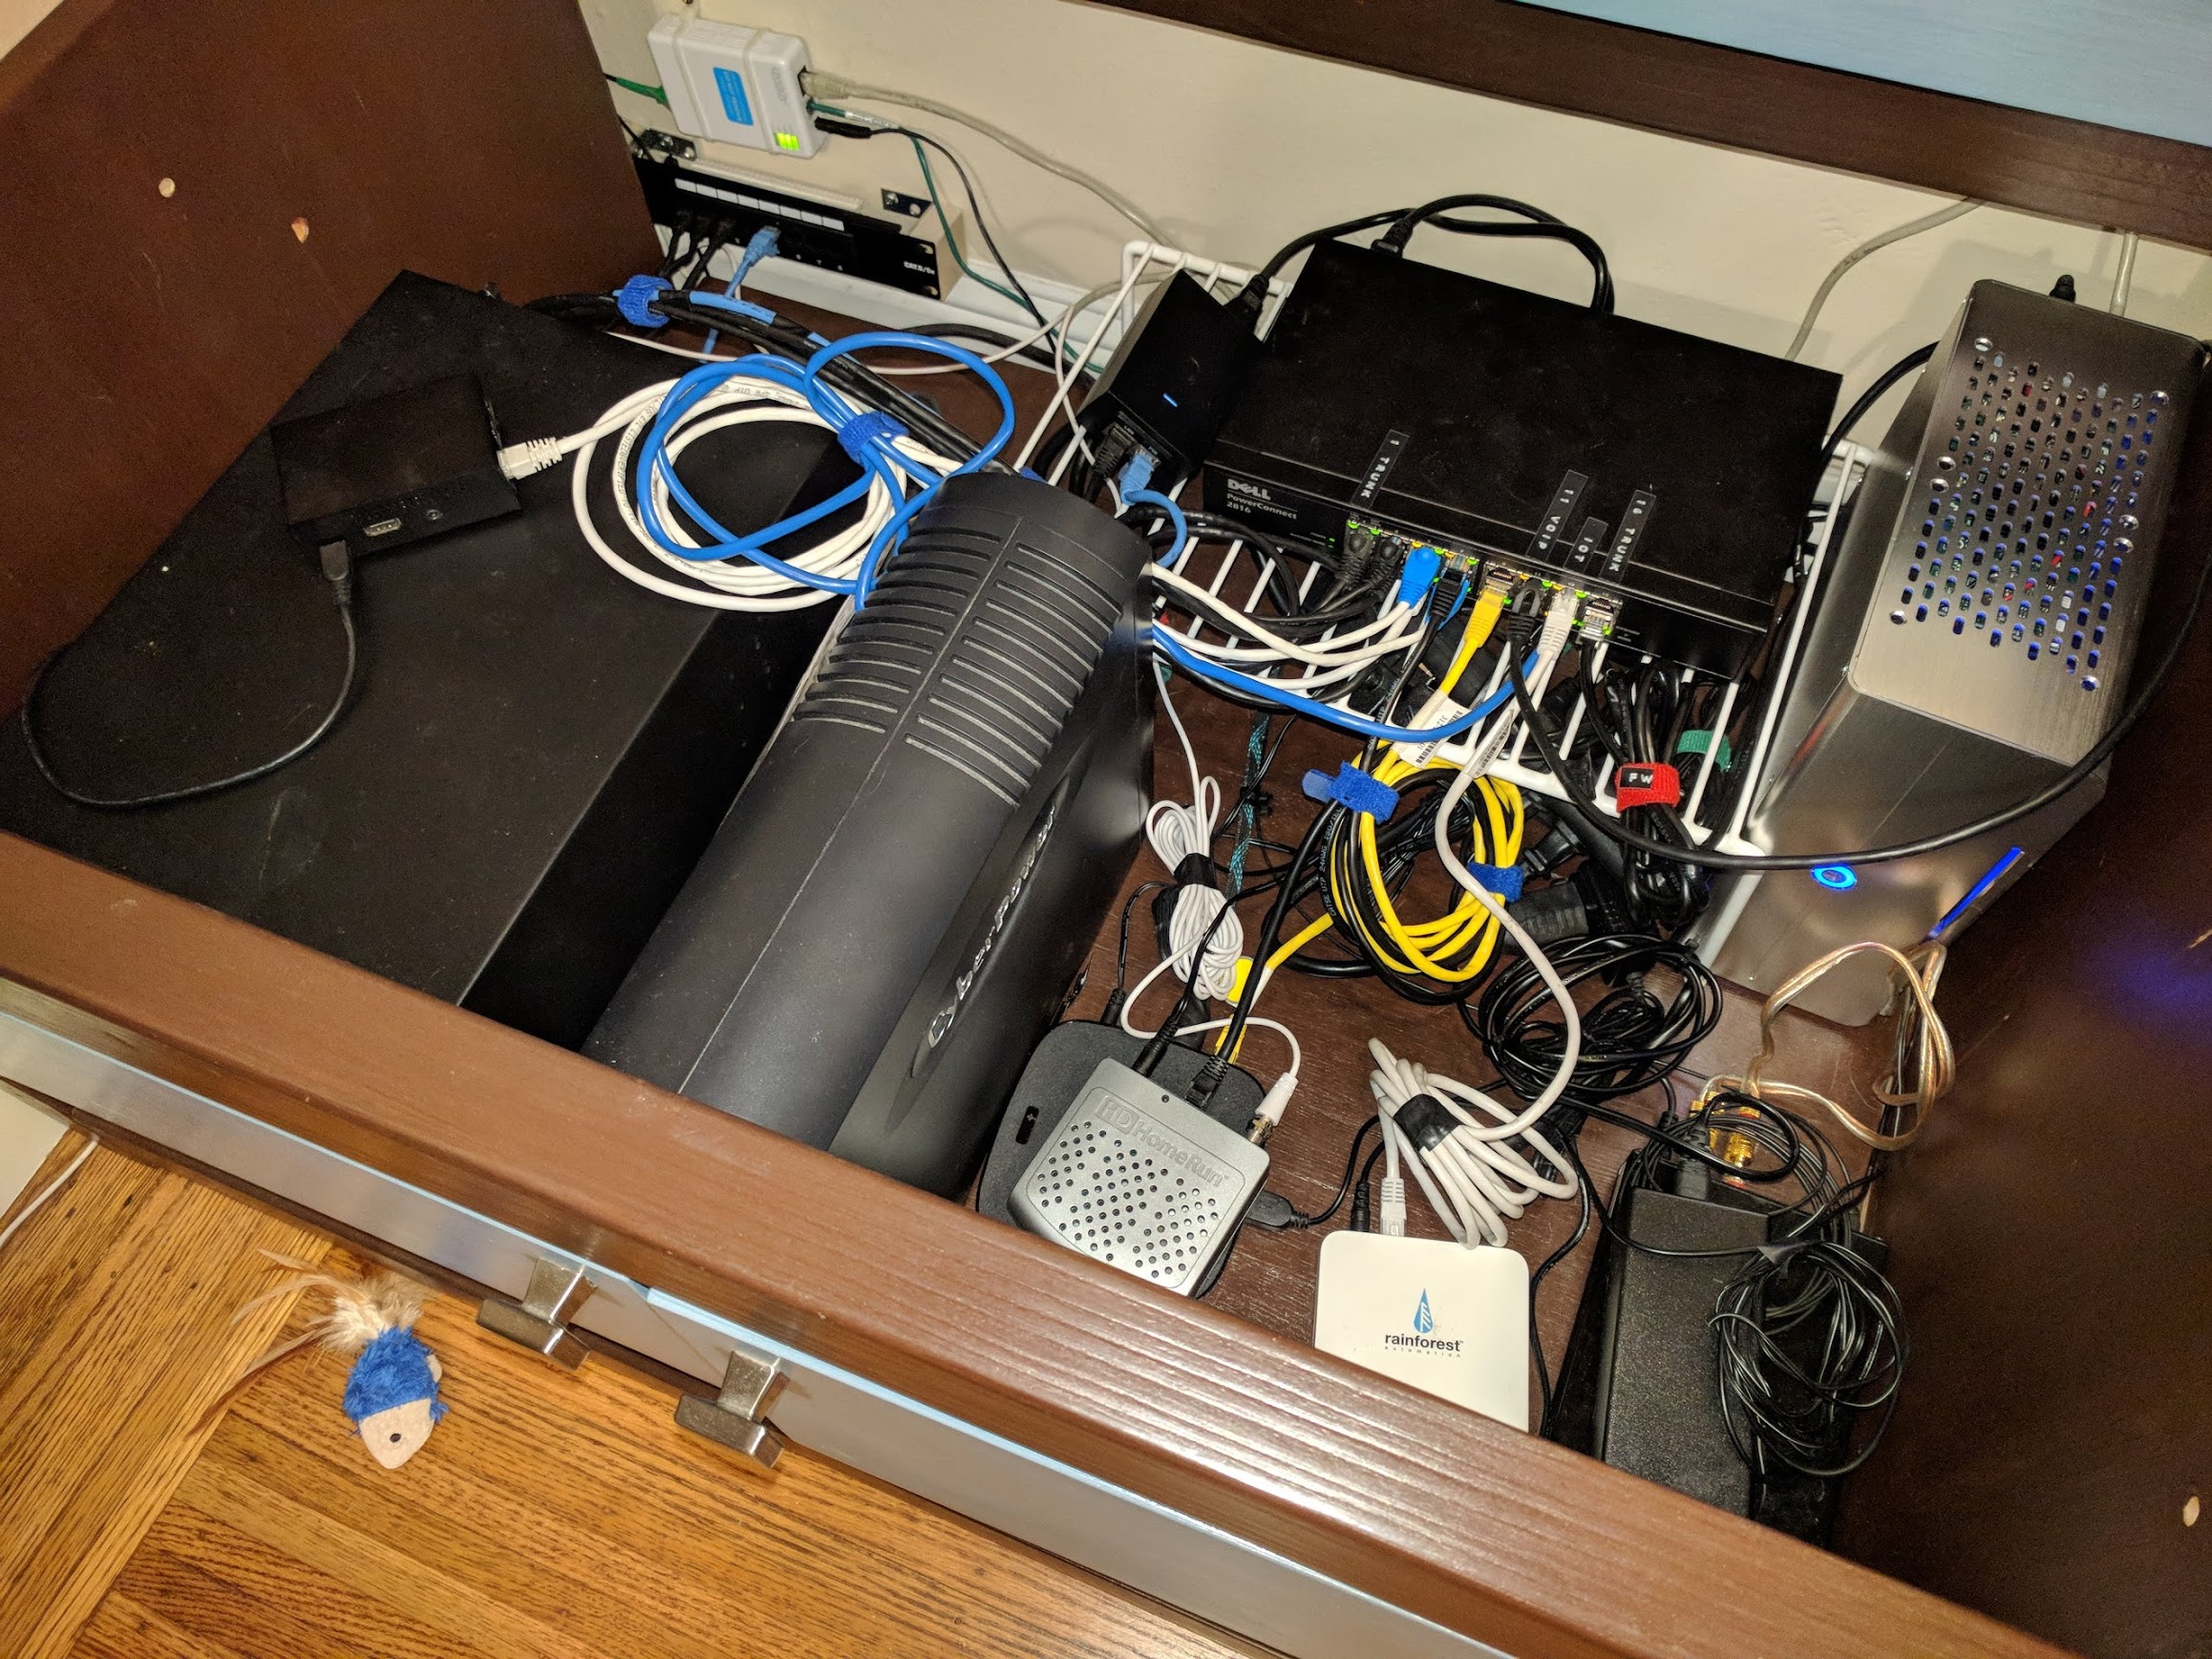
The Joys of Configuring a Refurbished Dell PowerConnect 2816
Challenge #1: Reset to Factory Defaults
I ended up buying a refurbished Dell PowerConnect 2816 off of eBay from a local business. The switch came with a one year warranty and arrived looking like new. — But unfortunately it just looked like new.
The Dell PowerConnect can either operate in managed or unmanaged mode, and there’s a small switch behind a pinhole that you can push with a paper clip to toggle it. However, toggling the switch between managed and unmanaged mode does not mean that the switch’s managed configuration gets reset.
This is an issue because the switch I received was apparently not reset to factory defaults, since I could not connect to the default management IP (192.168.2.1) using the default username/password combination (admin/no password).
If you ever encounter this situation, you are in for a treat: In order to reset the switch to it default configuration, you get to connect to the switch via its serial console. — Luckily Dell’s documentation tells you that you need a null-modem cable for this. — And because it is 2018 you probably don’t have a computer anymore that even has a serial port, you need two things:
- A USB to serial adapter
- A null modem cable
You can then connect the USB to serial adapter to your computer and the other end to the switch via the null-modem cable.
But the fun doesn’t end there: With a serial line both ends have to match configuration parameters and communication speed in terms of bits/second. While Dell does again do a good job documenting that the default is 9600bits/sec and 8N1, the problem is that we are not dealing with a switch in its default settings. While the 8N1 is not open for guessing, the transmit speed might have been changed. — So in order to reset a switch that runs an unknown configuration you also get to guess the serial line speed to use. Fortunately, in practice this comes down to maybe half a dozen settings you have to try.
Here are instructions on how to reset the switch to default settings using your null modem cable. — And yes, you have to hit a TWO SECOND window between when the switch comes up until it continues boot-up.
Putting this all together I probably wasted close to an hour to figure all this out and guess the right serial line speed and what not.
Also, why Dell lets you toggle the switch between managed and unmanaged mode via a pinhole reset button but decided to omit a “reset to factory default” that doesn’t require fiddling with serial ports and null modem cables I do not know. I get the whole security angle, but if I have physical access to the switch, I might as well unplug a cable/insert my own packet sniffing gizmo between the switch and the connected client.
Also have fun backing up or restoring the switch configuration, as it is done via TFTP. — But you get to specify the TFTP configuration parameters via a Web interface… 😉
But on the bright side I got an enterprise-level managed 16 port switch for about USD 55 including shipping, and I spent about another USD 20 for the USB/serial adapter and the null modem cable. And once I got the switch set up it turned out to be a solid performer.
Challenge #2: Set up VLANs
Client Ports
My goal was to set up VLANs in a way so that clients connecting to the switch can be blissfully unaware that they are on a VLAN: The idea is to teach the switch rules such as “all packets received on port 3 actually belong to VLAN 10, so tag all the untagged packets coming in. Discard all incoming packets that already have tags. Before forwarding a packet out to port 3, check that it is tagged for VLAN 10, otherwise discard it”.
Trunk Ports
While this works fine for clients such as, say, my desktop computer plugged into the switch, this does not work for the port that the pfSense router and the Ubiquiti Unifi AC Pro WiFi access point are plugged into: These devices need to see all packets on all VLANs: pfSense needs to route them and the access point has a WiFi network for each VLAN so it does the tagging and VLAN isolation by itself.
Configuring port on the switch this way is usually called “Trunking”, but you won’t find this term anywhere in the Web UI for the PowerConnect. — This is not a shortcoming, but it seems that different vendors use different terms.
Here is a good description of how to set this up on the Dell switch. Just mentally substitute “the other switch” with “the pfSense router” or “the wireless access point”.
The remainder of the network setup was smooth sailing.
VLANs on Ubiquity Unifi
Setting this up is really trivial. I got the Unifi software running on my pfSense firewall, as described in my earlier post. You can set up additional WiFi networks and assign them to a VLAN each within a minute.
VLANs on pfSense
Setting up VLANs on pfSense is also fairly easy. There are several good tutorials online and I ended up using this one.
Moving IoT Devices to a new WiFi Network: The Good, the Bad, But Mostly the Ugly…
Ironically moving existing IoT devices to the new WiFi network I created for them was a very painful experience. There were good, bad and mostly ugly:
Enphase Envoy: The Only One Who Gets This Right!
The Enphase Envoy is a little device that talks to your inverters on the roof and then acts as a web gateway, allowing you to view current solar energy production and it also sends the data to the Cloud.
This is the only product that gets this procedure right from the beginning to the end. — Moving an Enphase Envoy to a new WiFi network is absolutely pain free and works like this:
- While still connected to the current WiFi network, you log in and navigate to the “Wi-Fi Configuration”.
- You are presented a list of WiFi networks the Envoy found, or you can enter your own SSID in case your desired network doesn’t broadcast one.
- Specify credentials and hit “Test Connection”.
- The Envoy goes off for a minute and then comes back telling you “Yes, I managed to connect to the network using the credentials you specified and everything looks good. Do you want me to switch over?”
- You hit yes and you are done.
eMotorWerks Juicebox: Well…
The Juicebox is a gizmo that lives in our garage and plugs into an existing 240V outlet that was originally put there for an electric dryer. On the other end of the Juicebox there is a 24ft cord that plugs into the charging port of our car. The Juicebox reports state of charging via the internet and lets you set up charging windows, so that you can charge at night when electricity is the cheapest. Overall it is a really neat product and does its job very well.
I found a link to instructions provided by eMotorWerks here, that doesn’t require you to log into their help desk with a username/password.
Basically, every time you unplug the Juicebox and plug it back in, you have a ~30 second window in which the Juicebox broadcasts its own WiFi network. You connect to it and you land on a setup page where you enter info for the WiFi connection the Juicebox should use.
While this works fine I am not quite happy with the implied “every time the Juicebox powers up everyone in range can mess with its WiFi settings”. Admittedly the chances of that happening are somewhat low, and the amount of damage you can do without also having physical access to the device is probably small, but it kind of leaves an uneasy feeling…
Ring Pro Doorbell: At Least You Made An Effort
Well, you tried and put a “Change WiFi” option in your app. Why it is under “Device Health” and not “Device Settings” is anybody’s guess…
Changing the WiFi settings involves putting the doorbell into “Setup Mode”, which is fun. So here is how this turned out for me:
- Find the little Torx screwdriver that came with your doorbell.
- Go to the front of the house, smartphone in hand, with the Ring app open.
- Unscrew the plate covering the setup button.
- As instructed by the Ring app, press the setup button. — Wait a few minutes and realize that this isn’t working because your Ring app never manages to detect that the doorbell is in setup mode.
- Hold down the doorbell’s setup button for about 10 seconds till the light on the doorbell goes out. Let go of the button. Doorbell reboots and goes into Setup Mode.
- This time the app detects the doorbell in Setup Mode. Enter new WiFi info and cringe when your doorbell tells you that “Rome wasn’t built in a day”.
- After you are done, go to “Device Settings/Doorbell Kit Settings” and change it back to “None” if you have your doorbell directly connected to a 24V transformer. — Because this procedure also resets this to “Mechanical”, which means the doorbell will blow its fuse and then slowly die as its internal battery is drained (without telling you) the first time someone rings your doorbell. Been there, done that…
Nest Protect v2: Seriously, Google???
This is when the fun really starts: These nifty smoke alarms made by Nest (acquired by Google for 3.2 bn dollars in 2014) talk to each other via a mesh network. But they also connect to your WiFi so that they can send you email when your house is about to burn down…
Here is Google’s/Nest’s official description on how to change the WiFi settings for your Nest Protect smoke alarms, and it comes down to this:
- Go get your favorite ladder. Run through your house and unplug each and every Nest Protect in your house from your wiring and remove them all from the ceiling.
- Put them together in one happy group on your living room table.
- REMOVE all of them from your account.
- Pretend that you just bought a bunch of new Nest Protects and ADD THEM BACK to your account one by one using the new WiFi settings. — Bonus points for figuring out that the “remove battery tab” step in the instructions provided online needs to be replaced with “push the button on the Nest Protect”, because your Nest Protects aren’t actually new…
- To get even more exercise, you now get to climb up the ladder again and put all the smoke detectors back onto the ceiling. — Bonus points for putting them back onto the right spot, i.e: the one you named “Living Room” should actually end up in the living room and not the downstairs hallway…
Dear Google, please contact Enphase to see how something like this should be handled.
Belkin WeMo Light Switch: I don’t Know What To Say…
I installed one of these light switches because I wanted some project running on a Raspberry Pi be able to control that switch (a story for another time). — This only sort of, kind of worked, so I resigned and set this thing up via IFTTT for “turn on the light on the front porch when the sun sets, and turn it back off in the morning”.
Here are the instructions for changing WiFi info from Belkin. And here is a quote from it:
Before restoring your Wemo device to its original settings, make sure that the Remote Access feature and any rules associated to it have been disabled from every mobile device that is connected to the Wemo device. If you do not disable Remote Access from these devices, you may need to re-install the Wemo App later on.
I am not sure what happened but this step never worked for me. The “Disable Remote Access” option was always disabled in the WeMo app.
I proceeded anyways and I managed to get the WeMo switch connected to the new WiFi network. Apparently IFTTT can still talk to it because the light turns on/turns off as intended. However, the WeMo app is no longer able to communicate with the switch, no matter whether my phone is connected to the same WiFi network or not.
No means of deleting the WeMo app from all my Android devices/Clearing the App Data/reinstalling the WeMo app has solved this.
For now it works for what I need it to do. Should this ever fail I will probably just rip it out and install a solar timer. Not everything needs to be connected to the Interwebs. — At least I know the solar timer will never become part of a botnet.
Conclusion
At least it is done now. And I don’t want to go through this procedure again. But this experience has only reaffirmed my belief that IoT devices should be relegated to their own network.
In retrospect, what I would probably have done is go the other way: Leave the current network setting as the “IoT” network and move everybody who is not considered IoT onto a new network. — But when I started out I did not expect that such a simple thing as changing WiFi info on connected devices would turn into an ordeal like this…
Update 5 Months in
After getting everything set up as described in the article, life has been mostly good with this network setup. — There was only one more thing to resolve:
One thing that became annoying was that clients connected via ethernet, such as our desktop computers, were seeing a 30 second delay from when they were powered on until they were able to communicate over the network and get a DHCP lease.
While this is not an issue with devices that are always on, such as our file server, this turned out quite annoying for desktop computers that are turned on and off every day.
Dell PowerConnect 2816 — Fast Link
After scratching my head for a while, I found out that this behavior is caused by the Dell PowerConnect switch. — Since this is enterprise-grade hardware, when it detects a new link on a port, it will not immediately start forwarding packets to/from that port, but first make sure that the new link did not cause a loop in the ethernet fabric (Spanning Tree), which would bring the entire network to its knees.
Turns out there is an option for that. On the Dell switch you can enable the “Fast Link” option for one or more ports. In that case the switch will start forwarding packets to/from a new link immediately. Downside is your network might be hosed for a while since there is a window where a loop might exist in your network, until the switch detects it.
However, in my case loops are pretty much impossible since I have only one switch. — Here is a good description on how to enable “Fast Link” on Dell PowerConnect 28xx switches, which resolved this final issue.
WeMo Switch
Things with the WeMo switch got from bad to worse over time. I was never able to restore access to the switch, but IFTTT still managed to communicate with it. However, this feature is now starting to get flaky as well and the light would sometimes not turn on or turn off. I decided to not waste any more time with this device and replace it with a ZWave switch that can be controlled by our alarm system.